A quick start to setting up the excellent LMK2 midi keyboard made by Deopfer, to feel more realistic playing and recording piano. To find all the details of what this keyboard can do you can find the Doepfer manual here.
One thing to be wary of…
Make sure you are not unintentionally using a preset which is duplicating the midi information on multiple channels, as you could end up with a nasty phasy sound if your sound source is set to receive on all channels.

Presets
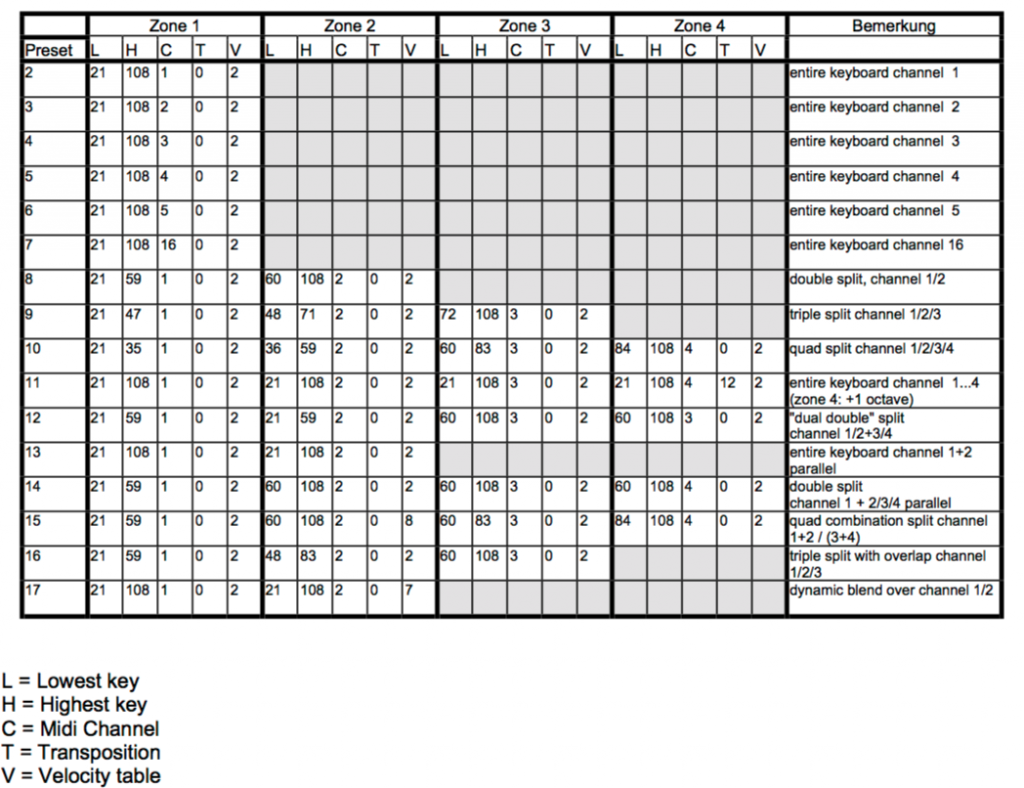
There are 17 presets available to you. Preset 2 – 17 will revert to their factory settings when you turn the keyboard on…in other words you will lose any changes you have previously made. Luckily changes made to PRESET 1 will be remembered when you shut the keyboard down.
Here is a list of all the presets. If you look at say Preset 13, you can see this one will send out your note information on channel 1 and 2. To check which preset you are on, hit the preset button – if it’s ok just hit another button to clear it.
To change your preset you need to do the following:
Hit the preset button and hold down the C0 key and then C1 key an octave higher at the same time. Release and that combination will load load Preset 1. Pressing C0 & C#1 together will load Preset 2 etc.

Velocity Curves
If you want to keep the changes we’re going to make then load up Preset 1 so the keyboard will remember your changes for your next session.
To get a nice piano feel to the keyboard which works with your piano samples, it’s worth trying out the various velocity curves that are available. There are 8 to choose from – and then importantly another 8 (9-16) which are the same as 1-8, except that with the second group, holding down a key very very gently will, like on a real piano, produce no sound. On 1-8 curves you can’t transmit a 0 velocity. I usually use 9, 10 or 11.
Here are the velocity curves from the manual:
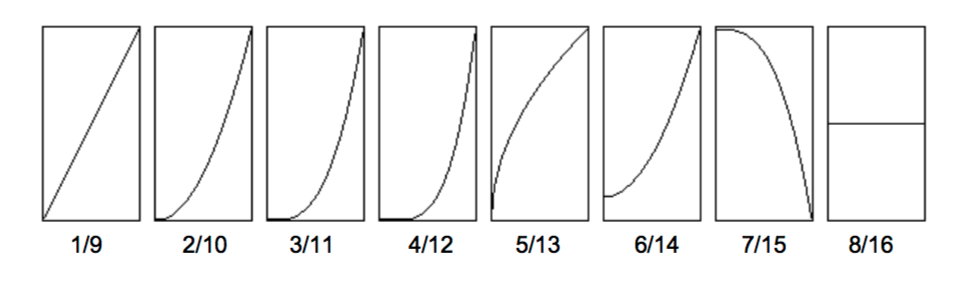
To change the velocity curve hit the velocity button and then as before hold down C0 and then C1 will be curve 1, C# curve 2 etc – so curve 10 is A1.
Splits
This defines the area of the keyboard designated to any of the 4 zones. So for my simple piano setup I just have zone 1 on channel 1 set to the whole keyboard.
To achieve this hit the ‘Split’ button at which point you will see the lowest note displayed with a number e.g. ’21’. When the display reads ‘Lo’ – hit your lowest key. The display should then display your highest key e.g. ’99’ and then ‘Hi’ – and you hit your highest key. Done.