Posted on

Fluffy Audio Scoring Piano – is this the nicest piano I have recorded…?

Fluffy Audio Scoring Piano Product Box Image
Scoring Piano from Fluffy Audio

For years and years I mostly recorded with Apple’s Logic stock Steinway sampled piano VI – not so much for the sound but for the feel. It’s just always been very playable. All of the piano albums I have done including tracks like Eternity were done on that piano.

But there are now better options and one of those is Fluffy Audio’s ‘Scoring Piano’. It delivers a beautiful rounded rich sound without any harshness and it’s super nice to play. Often you listen to demos of VIs and think they sound amazing but when you come to play them, you eventually feel disappointed. The real test for me is – after a couple of months am I still using it…. and with the Scoring Piano… yes I am. It features in the track below called ‘Sweet Moments’.


Find out more about the Scoring Piano from Fluffy Audio here


Sweet Moment
Composer Jonathan Slatter
Piano, bass and viola played by Jonathan Slatter
Published by Sounds Visual Music Ltd

Posted on

Extract Audio from Video in Reaper DAW

A quick easy way to extract the audio from a video is to drag your video into Reaper, and then simply select the audio in the timeline, and then right click the selection and hit ‘Glue’. This will bounce the audio to WAV (or whatever format you have selected in Project Settings / Media – it defauts to your recording Format – e.g. WAV 24bit)

As that process has now created a new audio track – you can delete the video file from project media if you no longer need it want to save space.

Project Settings / Media
Posted on

Adding a terms and conditions checkbox to a Payhip digital download product

If you are selling a digital download product on Payhip and want to require the customer to tick a terms and conditions check box before they pay, this is how you can set that up.

This product is triggering a Terms and Conditions choice

Once signed into your Payhip account go to ‘Account’ on the right, and click ‘Settings’. Then select ‘Advanced Settings’ and scroll down to ‘Checkout Settings’. You’ll see an option to:
Display your own questions for customers to answer during checkout.

Once ticked you will be able to add a checkout question which will appear on the checkout pane if a customer buys any of your products, or you make the question only appear for specific products. Very handy if you have different terms for different products. If you choose specific products you’ll then be able to add the relevant products, but you can edit this at any time.

Then add your question. Here I am going to choose ‘Legal’ as I want to ask the customer to agree to my terms in order to purchase:

I’m going to select legal type question to add T&Cs


Then you can type your question or statement. For example: I agree to the terms and conditions.
And if you want to link that text or part of it to a webpage – somewhere where the customer can review the terms – hit the # symbol and enter the URL.
Important! Also make sure to hit the spanner icon and make this a ‘Required’ question – so the customer has to agree to the terms in order to purchase your product. As you make these changes you should see the checkout pane on the right updating with your changes. Once happy – remember to ‘SAVE CHANGES’ – and then SAVE SETTINGS – and that’s it.

If you later add more products and want to add those to your exisiting terms and conditions question – come back into advanced settings – come down to your Checkout settings, and the specific question you wish to add to and click: ‘Edit Checkout Question’. Then click:
Questions will be displayed if one of these products are in cart (edit)

Now you can add and remove products from this question.

It’s a really professional feature and easy to setup on Payhip


Posted on

Embedding tempo BPM and transient slices into loops and samples in Reaper

How do we embed tempo and slice/transient/stretch markers into a rendered out audio file from Reaper.
It is done in the Render Dialogue where there are several options:
Note – when working in Reaper you cannot embed a Root Key, as it has no project key option. You can embed a key using Acid Pro.

Option 1: Render as WAV file only
No other options selected – no embed tempo or stretch markers. When you bring this file back into Reaper it will load straight onto a track and will not try to conform to the project tempo. Looking at the info for this imported file you can see it has no tempo or slice information.
However if you then subsequently change the project tempo, it will affect the play back speed of the loop if you have your timebase items set to Beats (position, length, rate) as opposed to Time in Project Settings. If you dont want this behaviour set it to Beats (position only)

No tempo or slice info

Option 2: Render as WAV with embedded tempo. Tick the ‘Embed Tempo’ option and render. When you import this file back into Reaper you will be given the option to let Reaper adjust your file to the project tempo or ignore it. (This import option displays according to your Preferences in Media/Import)

When you look at the info for this imported file you can see it now has a heading called: ACID with the BPM of 110.

Option 3: Render as WAV with stretch markers (seems to embed tempo whether selected or not)

To do this you need to add some stretch markers or transient guides to the item in Reaper. That’s a separate topic for another day.
You can only render with stretch markers with the ‘Source’ set to ‘Selected Media Items’ selected in the Render dialogue window.
Now when you import your file back into Reaper you will have more options in the Import Media Dialogue. First of all the dialogue is now called: ‘Slice Import” and there are 4 options:

And when we look at the info for the imported file, it now has slice information as well as BPM.

It’s worth knowing that whether you add transient guides or stretch markers to your item in media and then render – when you import that file back into Reaper and choose to import the file with transient markers, they will appear on the item as green transient guides not stretch markers. As soon as you touch or move one of them they will become stretch markers.

Question is, does having this embedded information help with how flexible you can be moving away from the original tempo and key. I used to find that loops made in Acid Pro and called Acidised loops could take more stretching before unacceptable artifacts crept into the sound, but maybe not so much these days. The main difference I can see is that Acidized Loops contain extra information: not just the tempo and number of slices but the number of beats and the root key.
However with the time stretching algorithms in most DAWs, it’s quite easy to manipulate basic WAV files.
I’m not sure whether to carry on Acidising the WAV versions of my loop collections or just offer WAVS with embedded tempo and maybe slices and Apple Loops. The important thing would be to always include the BPM and Root key in the file name.

Posted on

How to tighten the timing of audio in Reaper using Stretch Markers. Improve the quality of your audio


How to tighten the timing of audio in the Reaper DAW. Using stretch markers to improve the playing and timing of a recorded piano piece. Recorded on a 1930s Berlin built Steck upright piano to a click track. By adding Reaper stretch markers to the main transients you can move parts of the recorded audio to tighten up the timing to the grid or beat. To manually add a stretch marker place the cursor where you want it to go on the wave form within an item – usually just before transient (highest / loudest part of the waveform) and click while holding down option/alt and cmd/ control. To remove a stretch marker – option or alt click it.

Posted on

Watermarking your audio files

If you have audio files that you would like to protect, then one way to do this is audio watermark them. In other words, add an extra piece of audio, like a voiceover or sound effect, to the audio file that repeats perhaps every ten seconds or so. If you have a lot of files,  then to do this manually would take a lot of time.

AG Watermark Generator

AG Watermark Logo Icon

Luckily there is a very good program to do all the work for you, and you can download a free demo and try it out.

AG Watermark Generator Banner No.1

Posted on

Setting up the Deopfer LMK2 to play piano

A quick start to setting up the excellent LMK2 midi keyboard made by Deopfer, to feel more realistic playing and recording piano. To find all the details of what this keyboard can do you can find the Doepfer manual here.

One thing to be wary of…
Make sure you are not unintentionally using a preset which is duplicating the midi information on multiple channels, as you could end up with a nasty phasy sound if your sound source is set to receive on all channels.

lmk2

Presets

There are 17 presets available to you. Preset 2 – 17 will revert to their factory settings when you turn the keyboard on…in other words you will lose any changes you have previously made. Luckily changes made to PRESET 1 will be remembered when you shut the keyboard down.

Here is a list of all the presets. If you look at say Preset 13, you can see this one will send out your note information on channel 1 and 2. To check which preset you are on, hit the preset button – if it’s ok just hit another button to clear it.
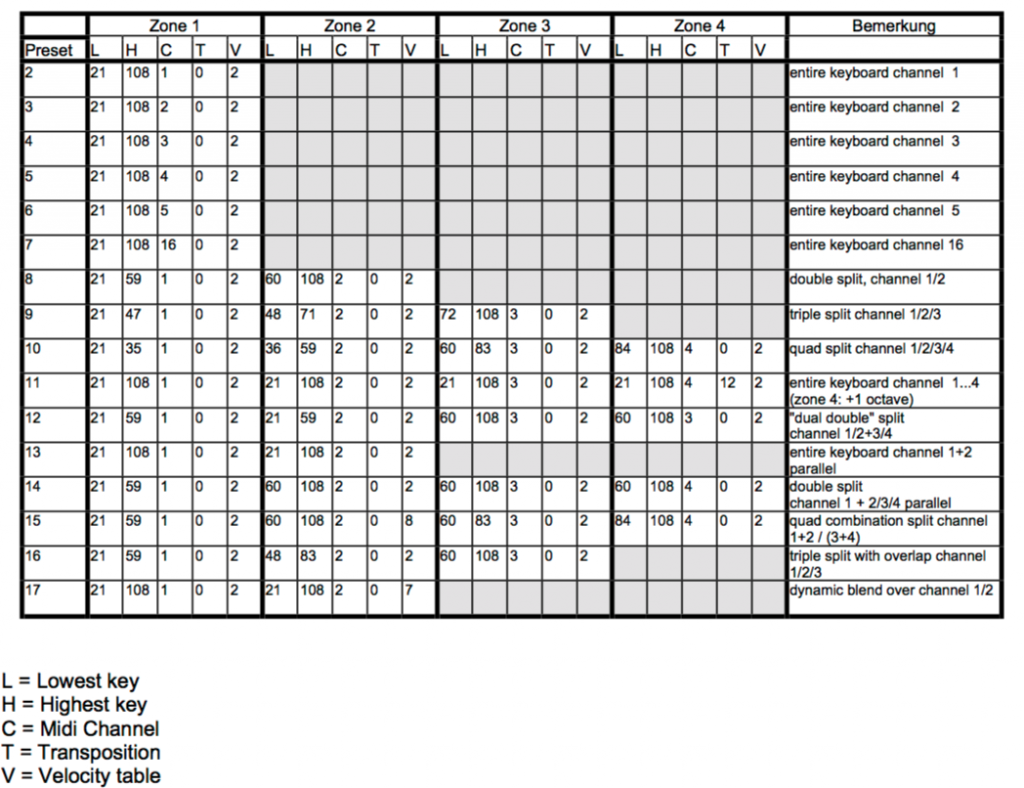
screen-shot-2016-09-27-at-12-41-04

To change your preset you need to do the following:
Hit the preset button and hold down the C0 key and then C1 key an octave higher at the same time. Release and that combination will load load Preset 1. Pressing C0 & C#1 together will load Preset 2 etc.

hands

Velocity Curves

If you want to keep the changes we’re going to make then load up Preset 1 so the keyboard will remember your changes for your next session.

To get a nice piano feel to the keyboard which works with your piano samples,  it’s worth trying out the various velocity curves that are available. There are 8 to choose from – and then importantly another 8 (9-16) which are the same as 1-8, except that with the second group, holding down a key very very gently will, like on a real piano, produce no sound. On 1-8 curves you can’t transmit a 0 velocity. I usually use 9, 10 or 11.
Here are the velocity curves from the manual:

screen-shot-2016-09-27-at-12-52-42

To change the velocity curve hit the velocity button and then as before hold down C0 and then C1 will be curve 1, C# curve 2 etc – so curve 10 is A1.

Splits

This defines the area of the keyboard designated to any of the 4 zones. So for my simple piano setup I just have zone 1 on channel 1 set to the whole keyboard.

To achieve this  hit the ‘Split’ button at which point you will see the lowest note displayed with a number  e.g. ’21’. When the display reads ‘Lo’ – hit your lowest key. The display should then display your highest key e.g. ’99’ and then  ‘Hi’ – and you hit your highest key. Done.


Posted on

Creating U-Law CCITT files for phone systems

I use Logic X for nearly all the production work at YoPo Music. However for some lesser well known file conversions Audacity is a free programme that can be really useful.

[box] Some phone systems need audio files converted to u-law (aka mu-law – a companding algorithm used in telecommunication applications) and Audacity can do the conversion for this kind of file requirement.[/box]

To convert an ordinary WAV file to u-law CCITT 8 Hz mono in Audacity, this is the method I use.

    1. Open the WAV or other format file in Audacity
    2. Set your project “rate” to 8000 Hz (bottom left hand corner of window)Project rate
    3. If you have a stereo file then to convert to mono click the drop down menu in the track header and choose “split stereo to mono” then delete one of the 2 mono streams (see pic)Split to mono
    4. Then to save your new file go File/ Export/ click “other compressed formats”,click “options” and choose “WAV (Microsoft)” as Header and “U-Law” as Encoding.