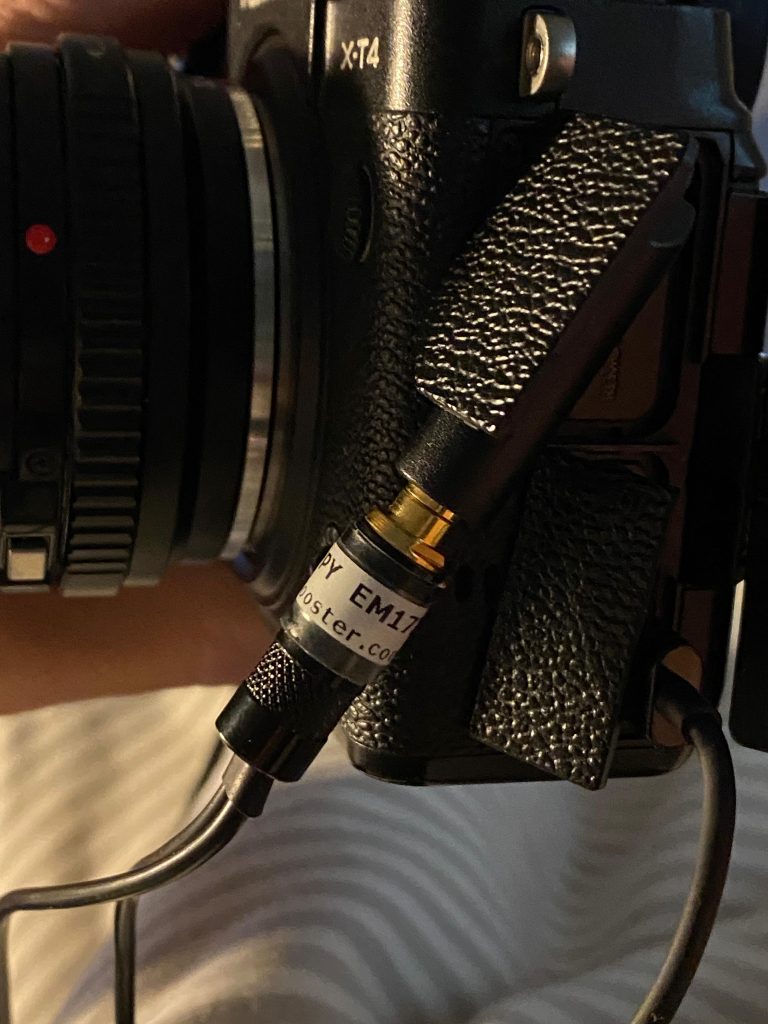
Despite the Fuji X-T4 manual stating that microphones requiring plug-in-power will not work, I have found that the exellent EM172 PIPS from Micbooster work very well with this camera. I wonder whether they mean microphones requiring phantom power, as wthout an adapter there is no way to use phantom power mics on the X-T4.
Plug-in-power (PIP) mics typically require 5 or less volts to operate whereas phantom powered mics typically require 11-48v.
Pip mics EM172s plugged into X-T4
With headphone monitoring via the USB-C adapter (which comes with the X-T4) recording decent audio on this camera is quite good.
EM172 PIPs with dead cats mounted on head…
I use some little dead womble fur wind protectors for the EM172s which in gentle breezes are quite effective in reducing wind noise and rumble. And attached to a hat on either side of my head they create a really good stereo image and there’s nothing to hold on to so you can concentrate on getting a good shot with the camera.
A beautiful tranquil escape into nature within a woodland nr Bitton, Bath called ‘The Retreat’. Stunning trees, paths and views towards the Severn Estuary and Bristol. https://forestofavontrust.org
Shot on XT4 with Canon FD 50mm f1.4 fully manual lens
A quick easy way to extract the audio from a video is to drag your video into Reaper, and then simply select the audio in the timeline, and then right click the selection and hit ‘Glue’. This will bounce the audio to WAV (or whatever format you have selected in Project Settings / Media – it defauts to your recording Format – e.g. WAV 24bit)
As that process has now created a new audio track – you can delete the video file from project media if you no longer need it want to save space.
If you are selling a digital download product on Payhip and want to require the customer to tick a terms and conditions check box before they pay, this is how you can set that up.
This product is triggering a Terms and Conditions choice
Once signed into your Payhip account go to ‘Account’ on the right, and click ‘Settings’. Then select ‘Advanced Settings’ and scroll down to ‘Checkout Settings’. You’ll see an option to: Display your own questions for customers to answer during checkout.
Once ticked you will be able to add a checkout question which will appear on the checkout pane if a customer buys any of your products, or you make the question only appear for specific products. Very handy if you have different terms for different products. If you choose specific products you’ll then be able to add the relevant products, but you can edit this at any time.
Then add your question. Here I am going to choose ‘Legal’ as I want to ask the customer to agree to my terms in order to purchase:
I’m going to select legal type question to add T&Cs
Then you can type your question or statement. For example: I agree to the terms and conditions. And if you want to link that text or part of it to a webpage – somewhere where the customer can review the terms – hit the # symbol and enter the URL. Important! Also make sure to hit the spanner icon and make this a ‘Required’ question – so the customer has to agree to the terms in order to purchase your product. As you make these changes you should see the checkout pane on the right updating with your changes. Once happy – remember to ‘SAVE CHANGES’ – and then SAVE SETTINGS – and that’s it.
If you later add more products and want to add those to your exisiting terms and conditions question – come back into advanced settings – come down to your Checkout settings, and the specific question you wish to add to and click: ‘Edit Checkout Question’. Then click: Questions will be displayed if one of these products are in cart (edit)
Now you can add and remove products from this question.
It’s a really professional feature and easy to setup on Payhip
Anyone can be a voiceover. It’s easy, and if I can, anyone can. So, if you want to become a voiceover, don’t delay, don’t think about it, just remember – it’s only reading aloud for money (usually).
At last, a slightly more self-depracating & tongue in cheek book about ‘how to make money from voiceovers…’
This book will guide you through the process of becoming a successful voiceover. It covers finding your voiceover voice, setting up your voiceover studio, marketing your voice, how to nail your first session, how to breathe, dealing with difficult producers, how to say words you can’t pronounce, why you don’t need an agent, why A.I doesn’t really matter, how to keep your neighbours quiet, what to wear and why you sometimes need two duvets.
I laughed out loud – Voice artist Kate Parker
As you turn the pages, you’ll learn all the tricks of the voice trade from someone who has been a professional voice for over 30 years and who has read over 2 million characters of on-hold messages.
Published by Sounds Visual Music Ltd. Copyright 2024. All rights reserved.
On this page you will find recordings and sheet music of the beautiful hymn, Nearer, my God, to Thee. The words were written by Sarah Flower Adams (1805 – 1848) and the famous hymn tune ‘Bethany’ was composed by Lowell Mason, (1792 – 1872) to accompany her text.
Many films about the sinking of the Titantic depict this hymn as being the last piece played by the ship’s string band. Sadly all of the ships’ musicians died when the vessel sank off the coast of Newfoundland, on its maiden voyage to New York, on April 15, 1912.
Sheet music arrangement of the hymn Nearer my God, to Thee, for piano and voice by Jonathan Slatter
Instead of paying for Christmas card stamps this year why not send a personalised copy of this lovely Pennypaws Christmas video to your loved ones – and help save more dogs this Christmas.
Every single penny raised goes to the dogs. Pennypaws is a UK Registered Charity (1200959) run entirely by volunteers.
Sublime gentle slow moving piano based track with lush strings.
A sense of peace, space and time standing still is created with a s low moving harmonic shifts and ling reverbs and echos. A special moment, a romantic scene or just an awe inspiring long view of something naturally wonderful.
How do we embed tempo and slice/transient/stretch markers into a rendered out audio file from Reaper. It is done in the Render Dialogue where there are several options: Note – when working in Reaper you cannot embed a Root Key, as it has no project key option. You can embed a key using Acid Pro.
Option 1: Render as WAV file only No other options selected – no embed tempo or stretch markers. When you bring this file back into Reaper it will load straight onto a track and will not try to conform to the project tempo. Looking at the info for this imported file you can see it has no tempo or slice information. However if you then subsequently change the project tempo, it will affect the play back speed of the loop if you have your timebase items set to Beats (position, length, rate) as opposed to Time in Project Settings. If you dont want this behaviour set it to Beats (position only)
No tempo or slice info
Option 2: Render as WAV with embedded tempo. Tick the ‘Embed Tempo’ option and render. When you import this file back into Reaper you will be given the option to let Reaper adjust your file to the project tempo or ignore it. (This import option displays according to your Preferences in Media/Import)
When you look at the info for this imported file you can see it now has a heading called: ACID with the BPM of 110.
Option 3: Render as WAV with stretch markers (seems to embed tempo whether selected or not)
To do this you need to add some stretch markers or transient guides to the item in Reaper. That’s a separate topic for another day. You can only render with stretch markers with the ‘Source’ set to ‘Selected Media Items’ selected in the Render dialogue window. Now when you import your file back into Reaper you will have more options in the Import Media Dialogue. First of all the dialogue is now called: ‘Slice Import” and there are 4 options:
And when we look at the info for the imported file, it now has slice information as well as BPM.
It’s worth knowing that whether you add transient guides or stretch markers to your item in media and then render – when you import that file back into Reaper and choose to import the file with transient markers, they will appear on the item as green transient guides not stretch markers. As soon as you touch or move one of them they will become stretch markers.
Question is, does having this embedded information help with how flexible you can be moving away from the original tempo and key. I used to find that loops made in Acid Pro and called Acidised loops could take more stretching before unacceptable artifacts crept into the sound, but maybe not so much these days. The main difference I can see is that Acidized Loops contain extra information: not just the tempo and number of slices but the number of beats and the root key. However with the time stretching algorithms in most DAWs, it’s quite easy to manipulate basic WAV files. I’m not sure whether to carry on Acidising the WAV versions of my loop collections or just offer WAVS with embedded tempo and maybe slices and Apple Loops. The important thing would be to always include the BPM and Root key in the file name.
This website uses cookies to improve your experience. We'll assume you're ok with this, but you can opt-out if you wish.AcceptRead More
Privacy & Cookies Policy
Privacy Overview
This website uses cookies to improve your experience while you navigate through the website. Out of these, the cookies that are categorized as necessary are stored on your browser as they are essential for the working of basic functionalities of the website. We also use third-party cookies that help us analyze and understand how you use this website. These cookies will be stored in your browser only with your consent. You also have the option to opt-out of these cookies. But opting out of some of these cookies may affect your browsing experience.
Necessary cookies are absolutely essential for the website to function properly. This category only includes cookies that ensures basic functionalities and security features of the website. These cookies do not store any personal information.
Any cookies that may not be particularly necessary for the website to function and is used specifically to collect user personal data via analytics, ads, other embedded contents are termed as non-necessary cookies. It is mandatory to procure user consent prior to running these cookies on your website.